


Introduction
Stepper motors don’t move on their own — not even a little. Without a driver, they just sit there humming, shaking, or overheating for no good reason.
If you've ever tried to get smooth, reliable motion from a stepper motor and ended up with skipped steps, jittery movement, or burnt-out components, you're not alone. Choosing the right stepper driver — and setting it up correctly — can be the difference between a project that runs like a dream and one that barely twitches.
So what exactly does a stepper driver do, and how do you know which one fits your motor, your budget, and your build?
In this article, we'll walk you through the role of a stepper motor driver, how it turns simple signals into precise motion, and what to look for when choosing one. We’ll also dig into common setup mistakes, troubleshooting tips, and features that actually make a difference — so you can skip the frustration and get straight to smooth, controlled movement.
What Exactly Does a Stepper Motor Driver Do?
Before we dive into how to choose a driver, let’s first understand what it actually does.
So, you've got a stepper motor. Awesome. But without the right driver, it's basically just a chunk of metal that buzzes, heats up, and does a whole lot of nothing useful. The driver is what brings it to life — kind of like the brain-to-muscle connection in your body. Let’s unpack how it works and why it’s the secret sauce in any motion control system.
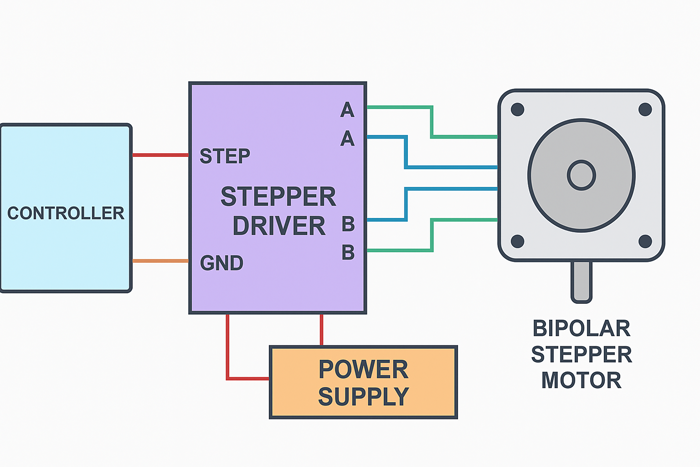
Figure 1: Basic step/direction wiring from Arduino Uno to DRV8825 stepper driver module, then to a 4-wire NEMA 17 motor.
Original diagram created for this article to illustrate driver-microcontroller-motor wiring logic (July 2025).
Translating Step Signals into Real Movement
At its core, a stepper driver acts as a translator — but instead of converting languages, it converts digital pulses into physical motion.
Here’s what happens behind the scenes:
Your controller (like an Arduino or a CNC breakout board) sends two basic signals — step and direction. These are just rapid on/off pulses and a binary flag saying “go left” or “go right.” The driver listens for those pulses and uses them to decide which motor coils to energize, when, and for how long.
Each pulse moves the motor one “step” forward or backward. But the driver doesn’t just turn a coil on and off like a switch. Nope — it ramps current up and down in a very specific sequence so the rotor moves cleanly and predictably. That sequencing is where all the magic happens.
Side note: This sequencing gets a lot more complex when microstepping comes into play — more on that in a bit.
In short: no driver = no motion. Or worse — bad motion.
Why You Can't Run a Stepper Motor Without a Driver
Now that we know the driver is essential, let’s see why you can’t just power the motor directly.
Let’s get this out of the way — you can’t just hook a stepper motor up to a power supply and expect it to work. If you try, you’re either going to fry the motor, the supply, or both.
Here’s why that doesn’t work:
-
Stepper motors need timed current pulses, not just raw voltage. The coils have to be energized in a precise order.
-
Current control matters. If you feed too much current, you overheat the motor. Too little, and it stalls or skips steps.
-
Direction and step management isn’t analog. You need logic-level switching at very precise intervals — usually thousands of times per second.
This is where a driver comes in. It acts as an intelligent current controller, limiting how much power goes to each coil, sequencing them in the correct order, and making sure your motor doesn’t self-destruct.
Bonus: most modern drivers also include thermal protection, short circuit detection, and other fail-safes. Because let's be honest, mistakes happen.
The Role of Microstepping: Smoothness vs. Torque
Video: Overview of stepper motor operation and micro‑stepping.
Once you’ve got basic motion working, microstepping becomes a powerful tool — but it comes with trade-offs.
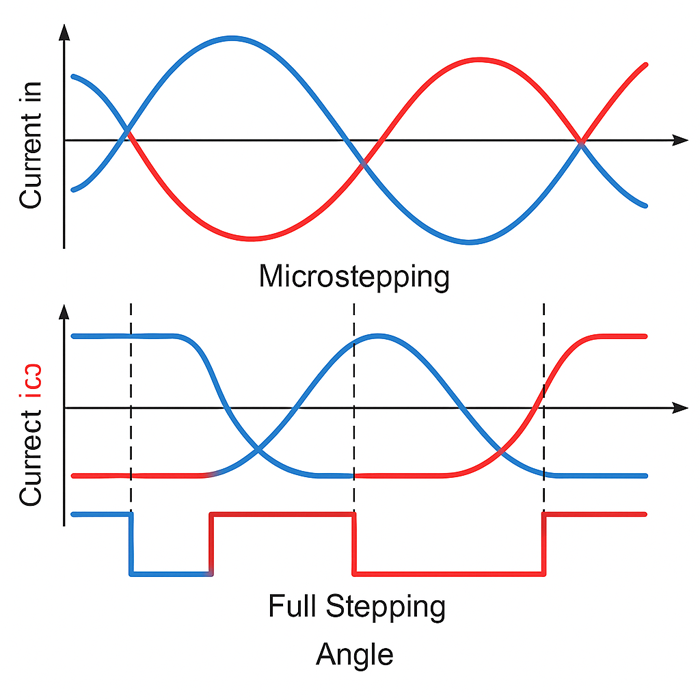
Figure 2: Current waveform comparison between full stepping (square waves) and microstepping (smooth sine-like waves) in stepper motor phases.
Original illustration created to visualize current profiles during microstepping vs full-step operation (July 2025).
If you’ve ever heard your stepper motor making a high-pitched whine or moving in tiny, ultra-smooth increments, that’s likely thanks to microstepping.
Instead of moving one full step per pulse (which can be kind of jerky), microstepping lets the driver divide each step into smaller sub-steps — sometimes hundreds of them. That means:
-
Smoother movement, especially at low speeds.
-
Less vibration and noise, which is critical for things like 3D printers.
-
More precise positioning, though this has diminishing returns.
But (and this is important), microstepping isn’t free.
-
You lose torque with each smaller division. A motor in 1/16 microstepping mode won’t be nearly as punchy as one running full steps.
-
At extreme microstepping levels, the resolution increase is more “illusion” than “precision” — the mechanical limits of your system still matter.
So when should you use it?
Use microstepping when your application values quiet, smooth motion over brute force. If you’re lifting a heavy Z-axis or slamming through a big CNC cut, you may want to dial it back.
From Open-Loop to Closed-Loop: Smart Drivers Explained
So far, we’ve talked about open-loop systems. But what if your project needs more precision and feedback?
Most basic stepper setups are open-loop. That means the controller sends commands and just assumes the motor did what it was told. No sensors, no feedback, just blind trust.
And honestly? That works surprisingly well — as long as you’ve tuned things correctly and your motor doesn’t miss steps.
But if accuracy is critical (think: laser cutters, robotic arms, or industrial machines), you may want to upgrade to a closed-loop stepper driver. These drivers monitor the motor’s actual position using encoders or feedback sensors. If the motor starts to fall behind or overshoot, the driver adjusts in real time.
A good example of this is the Leadshine AM882, a professional-grade closed-loop driver used in many CNC and automation systems. It combines encoder feedback, intelligent current control, and fault protection to ensure precise, safe operation.
Key benefits of closed-loop systems:
-
They recover from missed steps instead of compounding errors.
-
They can run cooler, since current is only applied when needed.
-
They reduce noise, especially during idle or deceleration.
That said, they come at a cost — both literally and in complexity. If you're a hobbyist or working on a budget, open-loop is often more than enough. But for professional or high-stakes projects? Closed-loop may be worth the investment.
Choosing the Right Driver for Your Project
Now that we’ve covered how stepper drivers work, it’s time to choose the one that fits your motor and application.
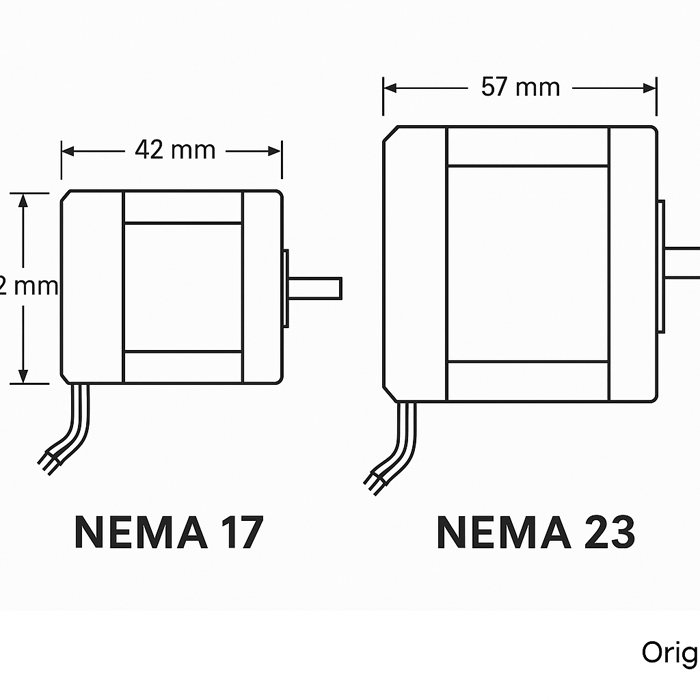
Figure 3: Size comparison between NEMA 17 (42×42 mm) and NEMA 23 (57×57 mm) stepper motors. Larger frames typically support higher torque and current.
Original technical illustration based on mechanical drawings from stepmotech datasheets (July 2025).
We just covered how stepper drivers bring motors to life — converting simple step signals into smooth, precise motion, handling current, timing, and even microstepping. By now, it’s pretty clear: the driver isn’t just a sidekick — it’s the core of your motion control system.
But here’s where many folks get stuck: How do you actually choose the right one?
There are dozens of options out there — some cheap and cheerful, others packed with features you may not even need. In this section, we’ll break down what to look for (and what to ignore), so you can confidently match a driver to your motor and your specific use case.
Matching the Driver to Your Motor: Current, Voltage, and Step Modes
Choosing the right driver starts with matching it to your motor’s electrical requirements.
Here’s the honest truth: choosing a driver isn’t about finding the “best” one — it’s about finding the right fit. Like pairing shoes to an outfit, or tires to a car, compatibility is everything.
Let’s start with the essentials:
-
Current Rating (Amps)
This is the big one. Your stepper motor has a rated current — let’s say 1.5A per phase. Your driver needs to support at least that much (preferably a little more). If it can’t supply enough, your motor will stall under load. Too much, and you risk overheating. -
Voltage Range
Contrary to popular belief, more voltage doesn’t mean more power — but it does mean faster response and higher top speed. Just make sure your motor’s insulation can handle it, and your power supply is in the right ballpark. -
Step Modes (Full, Half, 1/16, etc.)
Drivers support different microstepping modes. Don’t just pick the one with the biggest number — more microsteps = smoother movement, but also more work for your controller. Some drivers allow you to change this via DIP switches, others via software. For example, the Texas Instruments DRV8825 supports up to 1/32 microstepping and allows configuration through control pins or mode select inputs, as documented in the official datasheet.
Quick Tip: Check your motor’s datasheet first, then cross-reference with the driver’s spec sheet. Compatibility should always be confirmed before you hit “Buy.”
Heat, Noise, and Reliability: Performance Factors That Affect Everything
Beyond just matching specs, real-world performance matters — especially when it comes to heat, noise, and reliability.
Not all drivers are built the same — even if the specs look identical on paper.
Here’s where things get real-world messy:
-
Heat
Some drivers are notoriously hot-headed. If your driver lacks decent cooling or efficient current regulation, it’ll overheat — fast. And once it hits thermal shutdown? Game over, until it cools off.What to look for: Heatsinks, active cooling, or thermal protection features. Better yet, drivers with smart current regulation often run cooler to begin with.
-
Noise
If your machine sounds like a swarm of angry bees every time it moves, blame the driver. Older models (like A4988) are known for rough, noisy motion.Newer chips (like TMC2209) use advanced algorithms to reduce that racket. In fact, newer chips (like TMC2209) use stealthChop2 to achieve extremely quiet motion, according to the official Trinamic TMC2209 page.
-
Reliability
Cheap clones may save money upfront, but they often cut corners on protection features — like overcurrent shutdown, short circuit detection, or power-on sequencing. If your project is mission-critical, this stuff matters.
In short: if your setup runs hot, loud, or unpredictably, don’t just blame the motor — the driver might be the real problem.
Before we dive into mistakes, here’s a quick recap of where we’ve been:
We’ve seen how a stepper driver works its magic — converting logic pulses into smooth motion, regulating current, and even handling smart feedback. Then we moved into how to pick the right driver for your setup, from matching current ratings to choosing between silent drivers or those built for torque. Bottom line? Getting the specs right is half the battle.
But even with the perfect driver in hand, there’s still a whole world of things that can go wrong — and unfortunately, they often do. So let’s talk about the setup mistakes that sabotage more projects than you’d think — and how to steer clear of them without frying your hardware or losing your sanity.
Common Setup Mistakes and How to Avoid Them
Even with the perfect driver, poor setup can sabotage your project. Let’s look at some common mistakes.
Skipping the Current Limit Setup (And Why That Burns Your Motor)
You know that tiny potentiometer on your driver board that looks like it does nothing? Yeah, that’s your current limit adjustment, and ignoring it is one of the fastest ways to toast your motor or driver.
Why it matters:
Stepper motors don’t draw current based on what they need — they’ll suck up as much as you give them until something melts. That’s why you have to set a current ceiling manually (unless you’re using a smart driver with auto current regulation).
How to do it (the safe way):
-
Check your motor’s rated current (in amps per coil).
-
Grab a multimeter and measure voltage across the driver’s reference test points (often labeled “VREF”).
-
Use the driver’s formula to calculate the correct reference voltage (this varies — for example, on an A4988, it’s VREF = I * 8 × Rs).
The correct reference voltage for current limit can be calculated using the formula VREF = I × 8 × Rs, as specified in the Pololu A4988 driver documentation.
-
Adjust the trim pot gently — a tiny turn can change a lot.
Pro tip: Always start lower than the max rated current, especially for motors running continuously. A cooler motor is a happier motor.
Wiring Confusion: What Goes Where and Why It Matters
One of the most common rookie mistakes? Wiring the motor wrong. And to be fair, it’s not always obvious which wire is which — especially when the datasheet is vague or the motor came from a mystery seller.
Here’s what matters:
-
You must correctly identify the two coil pairs. If you mix up the wires, the motor won’t rotate properly — it might just vibrate or jitter.
-
Use a multimeter to find the pairs: resistance between wires = same coil.
-
Polarity also matters, especially for drivers that rely on coil sequencing for direction control. Reversing a coil can cause the motor to move erratically or skip steps.
Label everything before plugging it in. Trust us — five minutes spent labeling wires is better than an hour of “Why won’t this work?!”
Stepper Buzzing, Skipping, or Overheating? Troubleshooting Tips
Let’s say you did everything “right,” but the motor is still acting up. Here’s a quick checklist to isolate the issue:
Buzzing but no movement?
-
Check that your coil pairs are correct.
-
Make sure your driver is receiving step signals — no LED activity often means no pulses are getting through.
Skipping steps under load?
-
Your current setting may be too low.
-
Microstepping too aggressively can also reduce holding torque — try full or half-step mode for testing.
Overheating quickly?
-
You may have set the current too high.
-
Check if your driver has a heatsink or airflow — thermal shutdown may be kicking in without warning.
Movement is jerky or inconsistent?
-
Look at the step rate — going too slow or too fast for your driver can cause hiccups.
-
Try switching to a different step mode or reducing acceleration values in firmware.
You’re not alone — these are problems even seasoned tinkerers run into. The trick is to troubleshoot methodically, not emotionally.
Ground Loops, Signal Noise, and Interference: Quieting the Chaos
If your system behaves inconsistently — even after correct wiring — electrical noise may be the hidden culprit.
This one’s for the folks who double-check everything and still get weird behavior.
If your system sometimes works, sometimes doesn’t — or works great until something else powers up nearby — electrical noise might be the culprit.
Here’s how to calm the chaos:
-
Use a common ground. All components — controller, driver, power supply — should share a single ground reference.
-
Avoid long, unshielded step or direction lines. They act like antennas, picking up stray EMI.
-
Twist your step/direction wire pairs. This cancels out noise in many setups.
-
Add filtering capacitors close to your driver’s power input — sometimes a 100µF cap is all it takes to stop random resets.
Bonus: If you’re powering logic (5V) and motor voltage (12–24V) from the same PSU, double-check for voltage spikes when switching on/off. A small flyback diode can save your whole system.
Conclusion
Let’s wrap things up with a quick recap and some practical next steps.
By now, you’ve seen that a stepper motor driver does a lot more than just “make the motor move.” It’s the brain behind every precise step — controlling current, timing, direction, and even fine-tuning the smoothness of motion through microstepping. We also covered how to pick the right driver based on your motor specs, your project’s needs, and real-world performance factors like heat, noise, and reliability. And of course, we dug into common mistakes and how to avoid the ones that frustrate so many builders.
Whether you're building your first 3D printer, upgrading a CNC machine, or just trying to get more control over your motion system, the right driver — properly set up — makes all the difference.
Now’s the time to take what you’ve learned and apply it. Double-check your motor specs. Revisit your wiring. Adjust your current limit. And most of all, choose a driver that fits your setup, not just one that’s popular or cheap.
You don’t need to be an electrical engineer to get this right. With the right info and a bit of patience, you’ve got everything it takes to build a system that runs smooth, strong, and reliably — step after step.
Frequently Asked Questions
Can I run a stepper motor without a driver?
No. Stepper motors require timed electrical pulses to energize coils in sequence. Connecting them directly to a power supply can damage the motor or power source. A driver ensures proper current control, direction, and step sequencing.
What happens if I set the current limit too high?
Setting the current too high can cause your stepper motor and driver to overheat, potentially damaging both. It can also reduce efficiency and increase noise. Always match the current to your motor’s rated value using VREF adjustment.
Is microstepping always better?
Not necessarily. Microstepping improves smoothness and reduces noise, but it also reduces torque and increases controller workload. Use it when precision and quiet motion are important — not when maximum holding power is needed.
What’s the difference between open-loop and closed-loop stepper drivers?
Open-loop drivers don’t receive feedback from the motor — they assume it reaches the commanded position. Closed-loop drivers use sensors or encoders to track actual movement, adjusting in real time to prevent skipped steps and improve accuracy.
Which driver should I choose for a NEMA 17 motor?
It depends on your motor’s rated current and your application. A4988 and DRV8825 are common for low-cost setups. TMC2209 is ideal for quiet, smooth motion. Always check current ratings and voltage compatibility in both datasheets.